Lately I have received multiple questions about my photography, organizing and editing workflow. How do I get from taking the photo to posting it on Instagram. How I organize my photos, where do I store my edits, how do I transfer my photos to my phone, how I plan my feed.. I used to send those people to my How to create a chromatic Instagram feed showcasing your best photos? post that has answers to some of these questions, but a lot has changed. Not everything in the post is actual anymore. And there are more aspects that I did not do in 2020. So this is an update to the mentioned article – describing what is it that I do behind the scenes. Describing my organizing and editing workflow.
Behind a beautiful feed there is so much more than just pressing a button and doing an edit. There needs to be an optimized workflow for organizing, editing and storing the content too. Here’s how I do it for my flower and macro Instagram account.
TABLE OF CONTENTS
Capturing the photos
I use a Sony a7 IV camera to capture my photos along with one of my three lenses.
My lens setup includes:
- Sony FE 90mm F2.8 Macro G OSS
- Sony FE 135mm F1.8 GM
- Sigma ART 50mm F1.4 DG HSM
The 90mm one is my main driver I use for the majority of the photos, especially the insect shots.
All my photos are captured in RAW + JPEG format, and I store them in the Pergear 256GB CFexpress 4.0 Type A Memory Card.
Backing up the photos
After a successful photoshoot I copy all the taken photos into a new folder on my external SSD. Since mid-2025 I use a 4TB Samsung Portable SSD T9.
Over half of the drive is already filled with photos – I’ve taken over 17’000 photos with over 90 photographing sessions/days in 11 months. Is that a lot or is this number normal for you?
Disclaimer: I do not delete the photos that I don’t select for editing. Just in case – I leave them available. But I can delete then anytime when I am in need of storage on my drive.
Each session is stored into a separate folder with the corresponding date. Here is how one of the years look:

Once the photos are in a new folder on my drive, I move the RAWs to a separate folder for easier management.
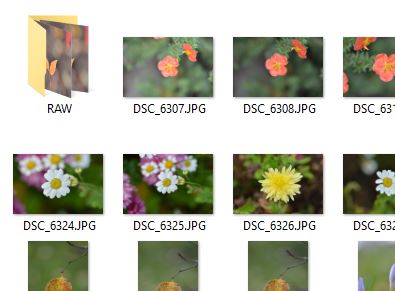
I then go through the JPEGs to find the good ones – and move the according RAW photo into another new folder.
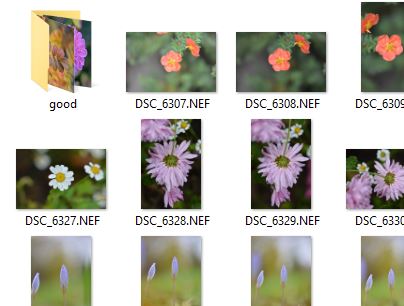
Quite frequently I also capture photos that need to be focus stacked in order to be further edited. In such case I use the JPEGs if there are no overexposed or underexposed spots. Alternatively I do a quick processing on the RAWs (brighten or darken the photo and selective parts of the image) and focus stack those. Sometimes even 1/3 of all the chosen photos are focus stacks. Here is such example from October 23rd.

After going through all the photos and making a selection – I load all of the selection into Lightroom.
Why take both RAW and JPEG? How does that help the organizing and editing workflow?
You might ask “Why do you even capture JPEG if you edit the RAWs?” . That’s a great question, and can be explained with a little backstory.
I used to take my photos only in JPEG. Only in the Summer of 2019 – I started turning on the RAW option for some sceneries that I felt were more challenging. It took me a couple of months to fully switch to capturing a RAW of every photo I take. Since it was a transition period – I used both. I also used to load all my JPEG photos in Google Photos to make an easily searchable collection of my photos. I stopped doing that after the storage on Google photos was no longer free.
Now I still keep the JPEGs as I feel like it is quicker and easier for me to go through the JPEG photos on my computer instead of the RAWS. Since I zoom in on all my photos to determine how sharp they are – this process goes quicker with JPEGs. My RAWs also appear darker than the JPEGs, so it seems more logical to look at a brighter version of the photo to evaluate the details.
Organizing and editing workflow in Lightroom
To edit and store my photos, I use Adobe Lightroom CC. All the photos are stored in Adobe’s cloud (I have a 1TB storage). That means the photos are also available on my phone, which is a feature I really love!
My Adobe Lightroom folder organization
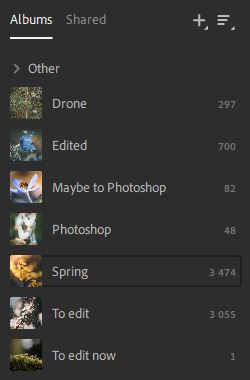
All my new photos are added in a “To Edit” folder. Once I start the edit and like where it is going – it gets added to a “Photoshop” folder. Once the photos are fully finished, they are moved to a folder called “Edited”. Here is a quick look at the folders described:
Editing the photos in Lightroom
Most of my photos are edited in Lightroom first.
I love editing on my phone for two reasons.
Reason one: I can edit in my bed, under a warm blanket. Or in kitchen while I’m waiting for the food to be ready. Or even in a car and on the way.
Reason two: it used to be the fact that the presets have a thumbnail on them. But recently this feature arrived to Lightroom on desktop as well! I love being able to scroll through my presets and immediately know if a preset won’t work for my photo, instead of hovering over each and every single one of them.
Back to how I edit. I go through my presets to find either a good starting look or find inspiration for colors for the photo. What I love in Lightroom is the ability to save multiple sketches as versions and choosing the best one afterwards. I won’t go into much detail about how I edit in Lightroom as I have covered this topic in another blog post of mine. Take a look at How I edit photos for my Instagram to learn more about my Lightroom editing workflow.
After I am satisfied with the starting edit and have transferred the photo to the “Photoshop” folder – it’s time for Photoshop.
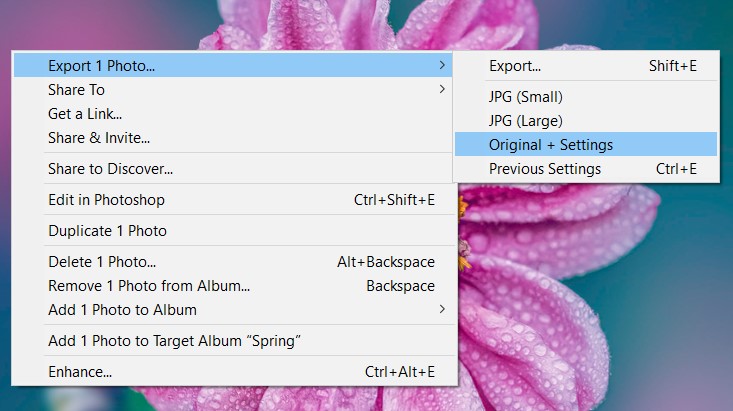
To export the photo I use the “Original + Settings” option. This exports the RAW, original file alongside with a .XMP file that contains the edits. You can consider it as a preset as it is the same file format you get your presets in.
Editing workflow in Photoshop
Since I export my photos with the original file – I get to continue the edit with the RAW file.
Working with Camera RAW Filter
The editing is continued in Photoshop’s Camera RAW Filter. It’s basically Lightroom built inside Photoshop. The big difference that Lightroom CC does not have, but Photoshop Camera RAW has – is Calibration settings that I always tweak.
What are Calibration settings? – You might ask.
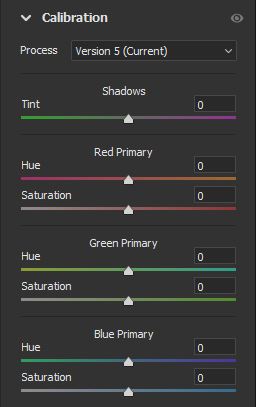
They’re a great way to alter the colors very beautifully and interestingly. And these alterations are considered as the main color in the Color mixer tool. That means if you change your greens to blues in the calibration settings, the color mixer will see those changed colors instead of the original ones. When you change the hue of the blue color, your color that originally was green – will be changed.
After I’m done in the Camera RAW – I use the option “Open as Object” to have the RAW with all the edits as an object. Doing this instead of choosing “Open as Copy” – allows me to make changes to the object, if needed. When possible, I always choose to edit non-destructively.
A quick learning lesson: Non-destructive editing is a method of editing a photo so that you don’t override the original image. That means – using adjustment layers, making changes in separate layers, and working with smart objects.

After making some changes, I immediately save the file as a PSD. I am quite overprotective, and hit the CTRL+S every other minute :))
Working with layers
I try to make my edits in separate layers, leaving the original untouched.
The things I use while editing the photo further are the following.
Photo expanding
If the scenery isn’t captured quite right, and you want a further-away scenery, or want to make a horizontal photo into a vertical one – this is for you. It is possible to expand a side of the photo and make Photoshop fill the content based on what’s in the photo. I have described how to do it more thoroughly in my Try These Tools to Recover and Fix Photos blog post.
Here is a simple example on me expanding a side of a photo to be able to fit it in 4:5 (now, 3:4) aspect ratio without losing the wide scenery:

Removing distractions
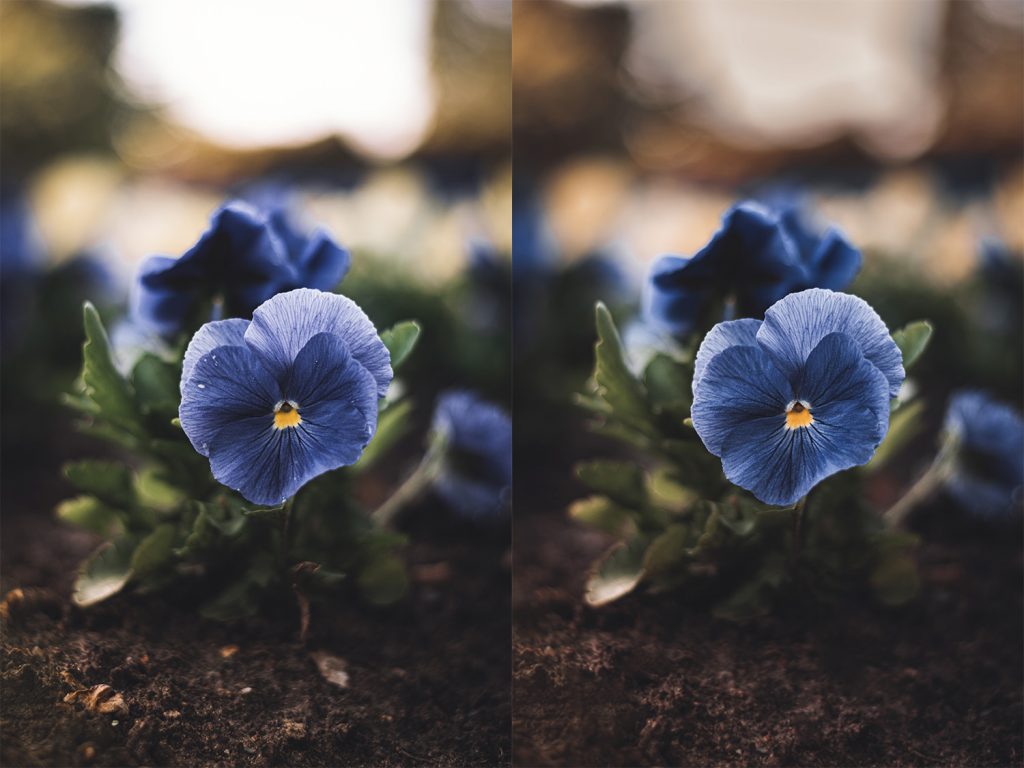
Just as you can fill the expanded areas of a photo, you can also remove any distraction from a photo. Simply select an area with a lasso tool and fill it!
Another rather simple example. I have gotten rid of distractions both in the foreground as well as on the flower.
Using adjustment layers
I make all the color, contrast and brightness changes through adjustment layers. These are the available options:
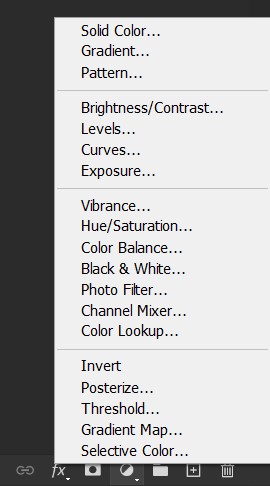
The ones I use the most to change the colors are: Selective Color, Channel Mixer, Color Balance and Hue/Saturation.
What’s cool about adjustment layers is that you can add a layer mark to it. This means that you can have the adjustment selective, and have it affect only a part of the photo.
Here’s a tip for adjustment layers: place the layer above the layer you want it to affect. Right-click the layer and choose “Create clipping mask”. This way your adjustments will affect only the one layer below it.
Adding overlays
I love to enhance my photos with overlays. Let them be bokeh, magic, dust or snow. There are two types of overlays. First – are overlays with black background. They blend very easily. Second – are self-taken photos of bokeh (or downloaded from other creators). I definitely have more challenge blending them naturally, but I am getting ahold of it quite well.
Here’s an example of a difference bokeh overlays make to a photo:
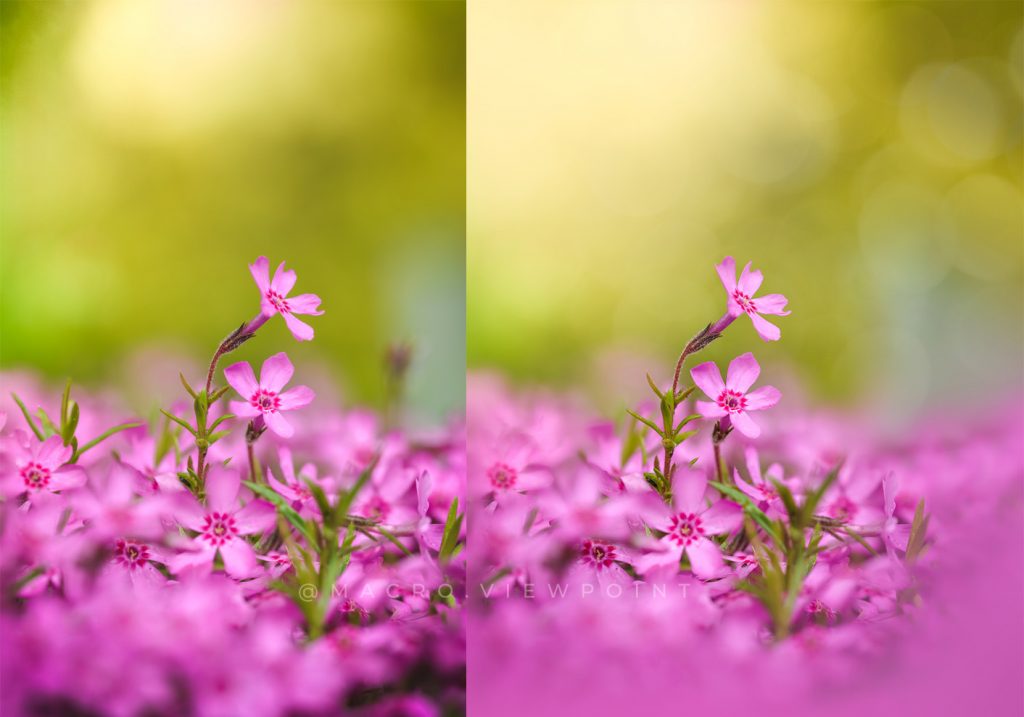
There are multiple users who offer free bokeh overlays that you can use for your photos. I will list them here.
Be sure to send me a message if you offer some too, or know someone who does – I’ll be sure to add them in!
Users who offer free bokeh overlays:
- @fromhersanctuary – a set of bokeh overlays created by a vintage lens. Tap here for a download link.
- @thedannie – two sets – fairy light bokeh and blurred textures. Tap here for a download link.
Separating the subject from the background and blurring the background
To separate the main subject from the background I use object selection, lasso and masking tools. I duplicate the layer and mask it.
Selecting the masked subject, expanding the selection and then filling the area on the background layer allows me to blur the background without leaving a glowing aura. I even made a reel about avoiding this editing mistake. Tap here if you haven’t seen it yet!
Editing workflow using other software
Besides Adobe Lightroom and Adobe Photoshop, I occasionally use other software too. In this list are two main tools: Topaz Sharpen AI and Topaz Denoise AI. Both help me fix problems in a photo. With the help of Denoise AI I can get rid of noise I have captured. Even such noise you would throw a photo out for. Meanwhile Sharpen AI can stabilize a shaky photo or simply sharpen a photo that lacks sharpness. It can even make out-of-focus areas sharper.
For an insight on my usage of Topaz Denoise AI, tap here. I have already covered it in another article.
Sometimes I am not happy with the result these tools do to the whole image. If I want only some part of the photo be sharper or be without noise – I load the result back into Photoshop and mask the areas I want to keep. It’s that easy.
Organizing the edited photos
After I finish an edit in Photoshop, I save the project file (a .PSD file). This allows me to return to the project at any time, make changes, add or even remove something. I store all the PSD files on my local drive on my computer.
Why don’t you store all your edits in Adobe cloud? – You might ask.
The answer is simple: each PSD file size for my edits can vary from 400MB up to even 2.5GB. That is a lot of storage for a single edit. Since I edit my photos in Photoshop only on my computer, I don’t have any need to have the files be accessible elsewhere. And since the storage on the cloud is limited, I choose to store them locally.
If you are curious to know how much storage all my PSD files currently take – the answer is 1.28 TB since in the span from 2021 to 2025.
Here’s how I organize the finished files:
All the finished photos get exported as a JPEG file with the maximal resolution. This allows me not to lose any information on the finished piece.
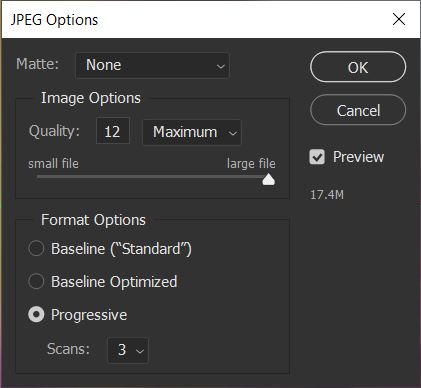
This exported JPEG gets loaded back in Adobe Lightroom where I do some finalizing touch-ups that I will mention further in this article.
I have a separate folder for all the finished JPEGs, so that I can easily browse through my photos and find one. All the other assets (exports that aren’t the final version as well as the PSD files) are stored in a separate folder for each project.
My workflow on naming the edited photos
Is there is a technique in naming my exported photos? Yes, there is.
I add a suffix in each exported photo from the program I used to work with it. For example, if I edit a photo in Photoshop, I will add “-ps”. If this file then gets processed in Topaz Sharpen AI, I add “-s” in the end. For denoising it’s “-d”. That means my file names sometimes look like “DSC_3538-lr-d-s-ps.jpg” in the end :)).
This helps me in two ways.
First: if the photos are ordered by filename, they are ordered in the order I have edited them.
Second: When sharing a photo to Instagram, I can easily know which software I used for the edit, and can mention this in the caption. Did you know that you can always find out in my captions – which post-processing software I have used for every photo I share?
An additional naming technique I have is for focus-stacked shots. When a photo is stacked from, let’s say, 15 photos, I will add “-stack-15” at the end.
This indicates the fact that a photo is focus stacked, and the number of photos it’s stacked from so I can see this information in Lightroom to include it in my Instagram post captions.
Recording the editing videos
I record my editing process in Adobe Photoshop for most of my edits to be able to provide editing tutorials / videos to anyone interested.
Find all of my editing recordings and tutorials here on Patreon.
Final steps in Lightroom
After exporting the JPEG from Photoshop, I transfer the photo back into Lightroom. After this, I do some final adjustments in Lightroom on my phone.
Each device’s screen shows colors differently. This is why I need to make sure the photo looks great on my phone as the majority of Instagram users use exactly this to view the posted photos.
In these final adjustments I make sure the colors look great, they aren’t too vivid, and the out-of-focus colors are rendered beautifully. I also tend to add more clarity and detail to some photos to get the best look.
Instagram feed organizing and planning workflow
After the edit is finished, I add a watermark to my photo (I have explained how to do that in Lightroom mobile in this blog post). Then I export my photo to Later. Later? What’s Later?
Planning my feed with Later
Later is an Instagram feed organizing, planning and post scheduling service. Available both as an application on a mobile phone, as well as as a website. I have been using this service for all my Instagram account’s lifetime. That’s more than 3 years.
In order to use Later, you will need to connect your Instagram account with it. If that is something you don’t want to do, you can use another application that I use for my other accounts – Garny. The difference between both apps are that Later stores the uploaded photos in their cloud, allowing you to also use it on your computer. Meanwhile Garny will work only as long as the files are still on your phone.
With such feed planning applications I can plan my feed and make sure the photos look good next to each other. This is also how I make sure the color transitions are as smooth as possible. I can reorder photos until I like how they look.
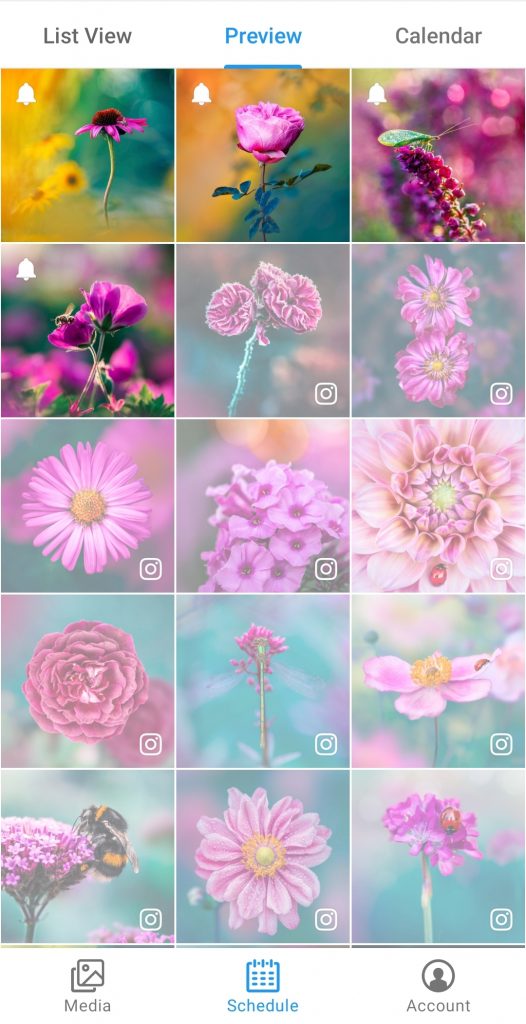
These apps also allow me to prepare my captions in advance.
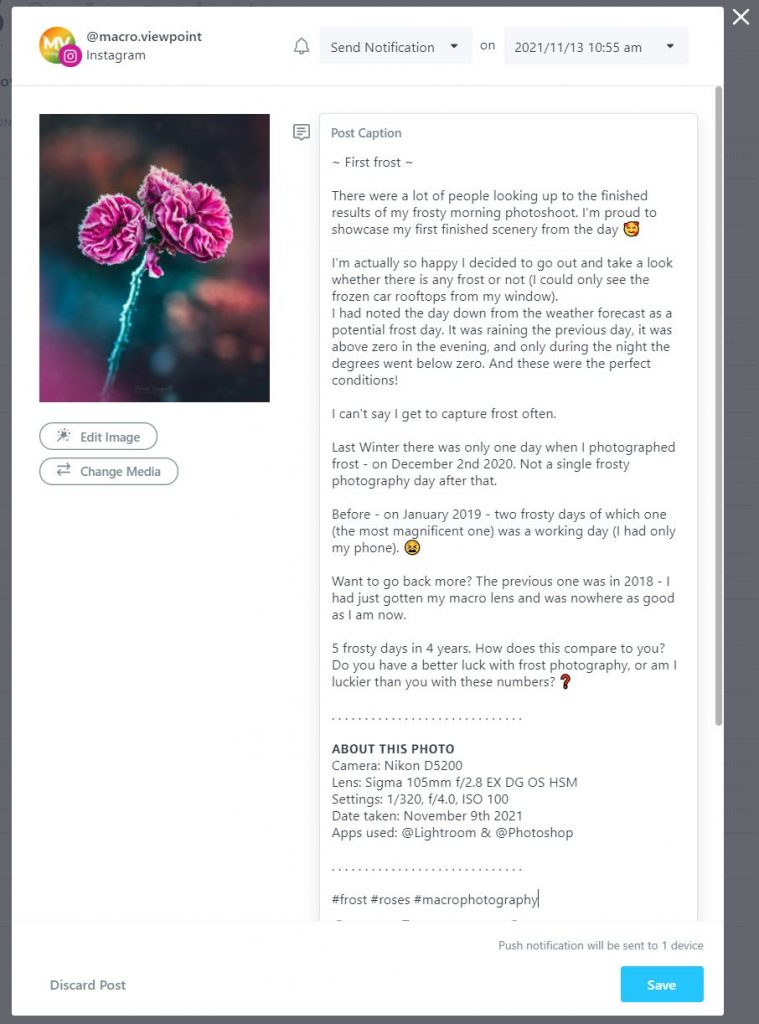
I love that I can receive posting notifications from Later on my phone before the planned posting time.
Managing hashtags for my Instagram posts
Organizing and choosing hashtags was a big problem in my Instagram beginning days. I stored them written as a text in note keeping applications. This made it hard for me to shuffle them around. I ended up either posting the same sets of hashtags, or spending a good amount of my time hand picking and copying them one by one.
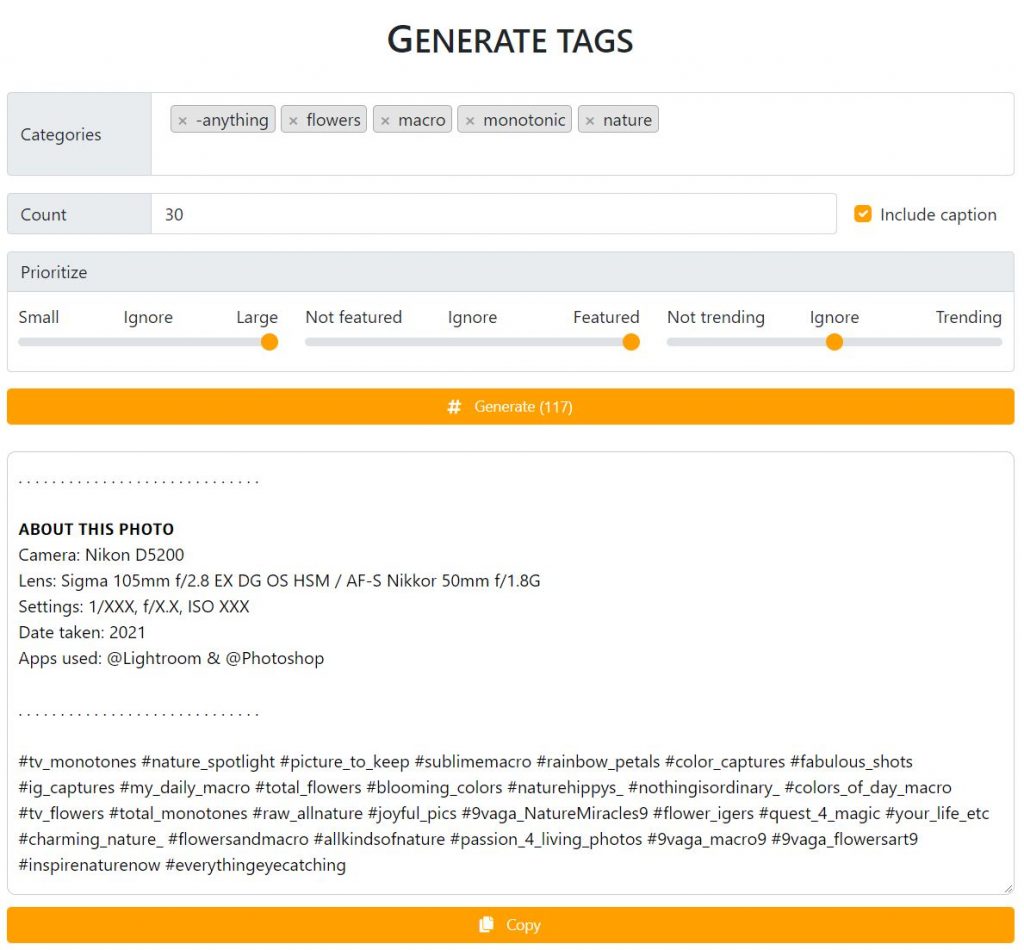
Since I never ended up finding any application that suited my needs, I created my own project for storing, organizing and generating my hashtags in random order.
I now have collected more than 500 hashtags of which over 400 are from feature hubs. Here’s a sneak peek on how I get my hashtags for my posts:
Posting to Instagram
I have received questions such as “What settings do you use to export your photos?”. “How do you get your photos look so sharp?”. Do you want to know the secret sauce?
There is none. I casually export my photo, using the “Small (2048 px)” size and share it to Later. Then I post the photo from the application. That’s it.
Some of my photos unfortunately turn out quite awful due to Instagram’s compression. Usually this happens to photos with dark gradient background. After the compression lots of banding/posterization appears. Unfortunately there is nothing I can do since it’s Instagram’s that does this. I just put up with the fact that some photos will be like this, and carry on (:
Posting to stock photography and printing websites
If a question such as “Why do you edit your photos to even removing the smallest distraction if no one will notice that on Instagram” arose in your mind, here’s why.
Besides Instagram I also post my photos to stock photography sites such as ShutterStock and Adobe Stock. Tap on the site name to open up my profile in each website.
To have a photo accepted on stock websites, you need to make sure it looks great even when zoomed all the way in. The subject needs to be in focus, there can’t be excessive noise and banding. Same goes for uploading my photos for printing – I make sure the photo looks as good it can look if I offer people to print it and have it hanging on their wall. This is why making my edits pixel perfect is important in my editing workflow.
Conclusion
Throughout all 7 years I have posted photos on my Instagram, I have improved so many things in my workflow. Not only improved, but I also have started using much more that I used to. If you have read my previous post where I described my workflow – I did not use any desktop software and used only mobile applications to edit my work.
After reading this article, it should be quite clear on what is it that I do to get from a RAW photo to a posted edit on my Instagram and my editing workflow. If you still have questions – my inbox is always open. Send me a message on Instagram and I can answer any other questions you might be curious about 🙂

