Have you struggled to get a macro photo that’s sharp on both the insect and flower petals? Was it too dark to use f/15, so used f/5, and the depth of field is too shallow? Did you know that with a bunch of photos with a shallow depth of field you can get a photo that’s completely sharp? With Adobe Photoshop’s focus stacking feature you can focus stack multiple photos with shallow depth to get one photo that has every sharp spot of all your photos combined. If this sounds unreal to you, then keep reading and learn how to achieve a focus stacked photo yourself.
TABLE OF CONTENTS
Photographing the subject
There is one rule: you need to take your photos in a way for Photoshop to understand them and be able to focus stack them. One technique is to focus once, and while maintaining that focus (and without moving left, right, up or down) – shoot multiple photos while slowly moving outwards of or towards your subject. Your goal is to take photos so that every bit of the subject has been captured sharp in some of your photos.
You might need to repeat this multiple times if you feel that you moved too much in between the shots, or you accidentally refocused on a different spot of the subject. Take your time to perfect the set of photos.
But here’s a lazier approach I often do: Stay in the same spot and take multiple photos with focus on different parts of the photos. Refocus for each photo. You might as well be able to combine them in Photoshop even if they are captured by refocusing. BUT you might have some parts that don’t look quite good if you moved your camera in between the shots. Later in this article I will show an example of the mistakes even I make in my stacked results.
I suggest starting with something that doesn’t move – a flower in a wind-less day perhaps. I haven’t captured insects yet, since they move a lot, and it’s challenging on getting them not to move while I take the shot. You can’t just tell them not to move, can you? If you can, message me and teach me, please, I promise not to tell anyone.
I mentioned two ways you can go with capturing photos. If the lighting allows – choose a larger f/ number and take less shots to combine. If not – go low and shoot lots and lots of photos. The most I have done is a bit over twenty shots. I know that others do it with a couple of hundred photos too.
More techniques
2022 update: Quite recently I have shared a new post about all the ways you can capture photos for stacking. Tap here to open the post, but note that it is visible only to my Patreon subscribers (Macro Professional tier or higher).
Focus stacking the photos
Once you think you have the photos ready to be focus stacked in Photoshop, do the following steps:
1. Open Adobe Photoshop
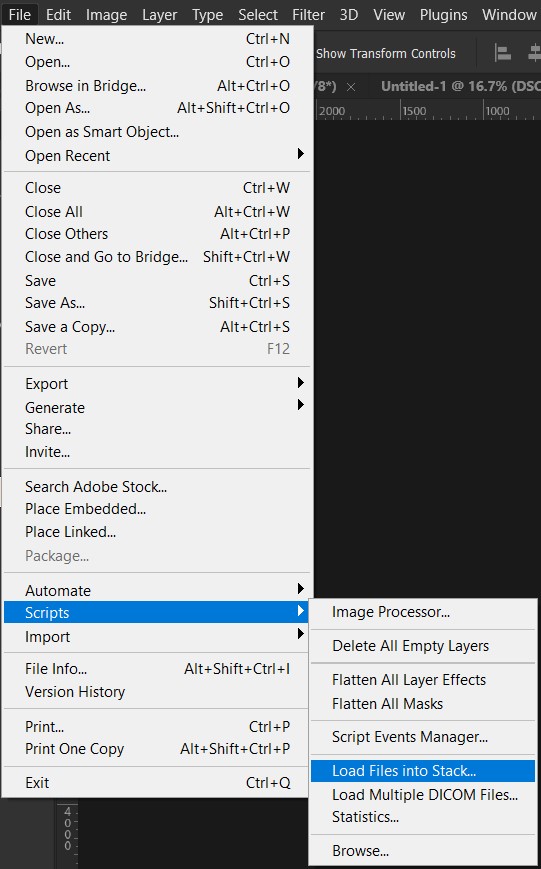
2. Choose File -> Scripts -> Load files into Stack…

3. Click Browse and choose all the photos that you want Photoshop to focus stack


Take in mind! You can also choose RAW files to use in focus stacking. But you need to have the edits already prepared for each of them by having the corresponding .XMP file alongside with each file. An alternative is to edit them and export them as JPEG as the final result of a focus stack is going to be a JPEG photo either way.
4. Check Attempt to Automatically Align Source Images and click OK
5. The Photoshop now will load all your photos into layers and attempt to align them. This might take a while depending on your computer’s speed
6. When the Photoshop has finished working – select all your layers (select the first one and use shift while clicking on the last one to select them all easily)

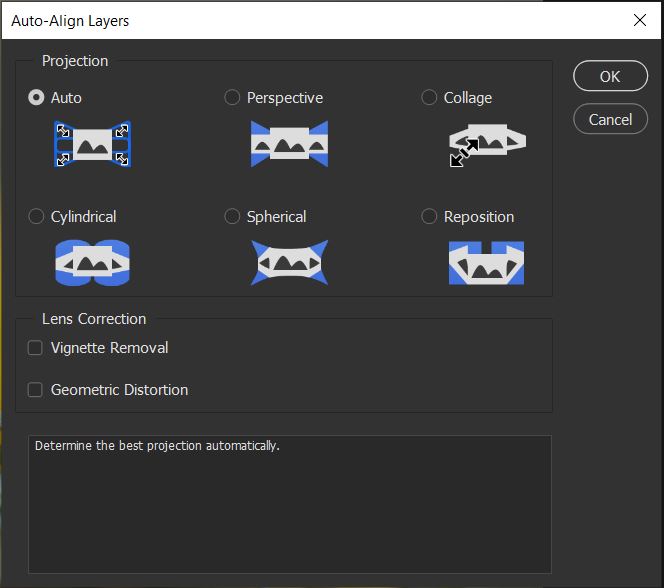
7. If you did not check the Attempt to Automatically Align Source Images in the previous step – choose Edit -> Auto-Align Layers…, leave the Auto on and click OK


This is how all the layers looked for me – watch the video to understand what kinds of photos are needed for a stack
8. Choose Edit -> Auto-Blend Layers

9. In the window – choose Stack Images (it should be selected as default), check Seamless Tones and Colors, check Content Aware Fill Transparent Areas and click OK

This action can take a while even on fast computers if you have a lot of photos imported, so you can take a break and get yourself a cup of coffee or tea while you’re waiting.
10. When the action is finished – you should have a photo with all the areas focused. Sometimes Photoshop’s automatic masking has to be corrected. You can hide a layer to see which part of the sharp image was taken from that layer if you’re curious or with to change.
11. If you did not choose Content Aware Fill Transparent Areas – you will need to crop the photo to remove the empty corners by using Crop tool (C on your keyboard)
Here is an example of difference the focus stacking made for the photo I used in the example:
12. Finally save your photo by choosing File->Save As… and choosing .JPG file extension. Then edit the stacked photo how you like
In case the photos didn’t get stacked properly
There could be three reasons behind it. Whether you forgot to align the layers, or the photos weren’t captured properly. Or both of those succeeded, but you had some spots of the subject that you didn’t capture in focus. Sometimes Photoshop can also be to blame. There have been cases when Photoshop took a blurred part of one photo instead of a sharp part of another. In such cases – I correct the masking to take the sharp part from the correct layer.
If you forgot to align the layers
You can select all the layers and choose Edit -> Auto Align Layers…, leave the Auto mode and click OK. Afterwards carry on with the step 6 and all the next ones.
If the photos weren’t captured properly
You can do nothing about it except go out and try to take the set of photos again. With time you will get better, the same way I do.
If there are blurred places in the stacked photo
This might be, because there was a place that was not captured sharp in any of the photos. Another option is that Photoshop made a mistake. If it’s the latter one, you can correct it by altering the mask of some of the layers. I have not made any tutorials on masking in Photoshop yet. Meanwhile feel free to look up some tutorials about the process online 🙂
The mistakes I make while stacking the photos
In no way I am trying to tell that I excel at focus stacking in Photoshop. I still get amazed by the work of others, who share a perfectly sharp focus of an insect’s eyes.
Take a look at some mistakes I still make in my focus stacking results:

You can notice some parts being strangely blurred (not quite in focus, not quite out of focus). Some parts do not align perfectly. And thhere are lines where you can clearly see that the photo has been focus stacked. If you create your work to upload on stock photo sites, such as ShutterStock or Adobe Stock – your photo might get declined due to these problems. But you might also get lucky! If you edit your photos just for Instagram – there is no need to worry about such tiny mistakes!
Examples and the result
I will show you some of my focus stacking results.
Here’s an easy one. I had two photos of a flower (which I actually didn’t take with an intent to focus stack), and they were perfect for a focus stack example. One has focus on an insect, and the other one – on the middle of the flower.


Here’s another focus stack example. This time it’s 11 photos:

This comparison of a single photo and a stacked photo shows you exactly how useful is this tool. Though I have made some mistakes in this photo, since there are places where the photo is blurred. I still have a lot to learn as well.
Update on September 2021: I thought I’d add a fresher example of my focus stacking results. Here is another one 🙂

Focus stacking done in 2022
Conclusion
A quite useful tool if you are struggling on getting your photos perfectly focused out of the camera. I myself tried focus stacking only a few months ago, and I’m surprised I didn’t try this sooner. I hadn’t tried focus stacking yet when I wrote my Top 10 favorites in Instagram: Macro February blog post. I’m mentioning this, because there is a focus stacked photo of an insect in between the top 10. Check the blog post out if you still haven’t.
Good luck on your first focus stacking experience in Photoshop. Don’t forget to show me your results, because I’m excited in seeing what you came up with from this tutorial! 🙂
If you want to learn focus bracketing (photographing a focus stack) and focus stacking on a deeper level with video examples of me capturing the photos and me combining them with Photoshop, have a look at my Patreon collection!


