
Winter this year has been quite generous with both snow and cold in Northern Europe. I’ve looked at other Instagram users posting something really intriguing and wonderful during Winter for more than 2 years. I said to myself that I wanted to try this someday, too. I’m talking about photographing freezing soap bubbles! Last year’s winter did not have many days cold enough to try this experiment and for the bubbles to freeze, but this Winter I finally dedicated myself to realizing the freezing soap bubble idea. And I did. I’m absolutely stunned by the results! And I’m more than happy to tell you about my experience and tell you what worked and what didn’t.
TABLE OF CONTENTS
What conditions are needed to freeze soap bubbles?
The first time I tried freezing soap bubbles was at just -3°C outside. But no, they did not freeze. If you don’t succeed the first time, be sure to still snap some photos of those soap bubbles; you could still get some pretty good shots, just like I did! Take a look at some non-freezing bubble photos from my Instagram.


The bubbles started to freeze when it was around -8°C. But the colder it is, the better and quicker they will freeze. I’ve been out when it’s -12°C as well, and they froze completely in around 30 seconds. See some of the freezing bubble results I’ve shared on my Instagram:


How to create a freezing bubble solution yourself?
I found loads of recipes online that required corn syrup. I searched for alternatives since I couldn’t find any nearby places that sell this ingredient. And I found mentions of glycerine. Finally with suggestions from multiple users on Instagram and searches through Google, I landed on this recipe.
To create a freezing bubble solution, you will need the following:
130ml water (65ml for 1/2 portion)
32ml dish soap (16ml for 1/2 portion)
26ml glycerine (13 ml for 1/2 portion)
1.2 tablespoons sugar (0.6 tbsp for 1/2 portion)
The initial sizes may seem odd because they are 1/2 of the recipe I found online. I divided everything into 4 since I did not need that much of the solution.
Glycerine will make the solution thicker and give it more endurance (especially useful when there’s wind). Meanwhile, sugar will help you get that beautiful crystallization pattern on the bubbles while they freeze.
I mixed all of the ingredients and boiled them just long enough for the sugar to melt. Afterwards, I filled the solution in tiny 10ml glass bottles. It was enough to fill five such bottles with the solution.
The colder the solution is, the quicker the bubble will freeze
A useful tip when preparing to freeze soap bubbles
The bottles I was planning on using were kept in the fridge, since the colder the solution is, the quicker the bubble will freeze. You can also place it in the freezer for 10-30 minutes before going out. Just make sure it doesn’t freeze in there.
Do store-bought bubble solutions freeze?
Short answer: Yes! Just add powdered sugar for the pretty crystals to form while freezing.
Long answer – they pop so easily with the slightest wind breeze. And they popped the moment they touched the cold snow, too. I didn’t manage to photograph any of these bubbles on the snow. I managed to freeze them while the bubble was placed on the blow-thingy, though.
Other freezing soap bubble tips from me
I’m definitely no expert at freezing soap bubbles and photographing them, but from the three times I’ve tried this, here are some tips I can give you.
Use a straw to blow the bubbles
If you want an easier way to place the bubbles onto snowy surfaces or place them in tight spots, use a straw to blow them. You can use any kind of straw; I used the basic plastic straws I had at home. I’ve read that having air in bubbles that is colder rather than your warm breath can help their endurance too. But I didn’t create any way to squeeze air through the straw without using my breath. It still worked pretty well.
Have an assistant
Since photographing the freezing bubbles requires cold, you will get cold pretty quickly too. And having an assistant who can blow the bubbles for you while you photograph them can be really helpful. Especially if they pop before you put down the straw and take the camera in your hands. Before you focus on the bubble, it may as well pop. An alternative is using a tripod and having your focus ready on the spot you plan to blow the bubbles on.
Find someplace without wind
The bubbles pop really quickly with just the slightest breeze of wind. So be sure to find a place where the wind can’t get to you and the bubble.
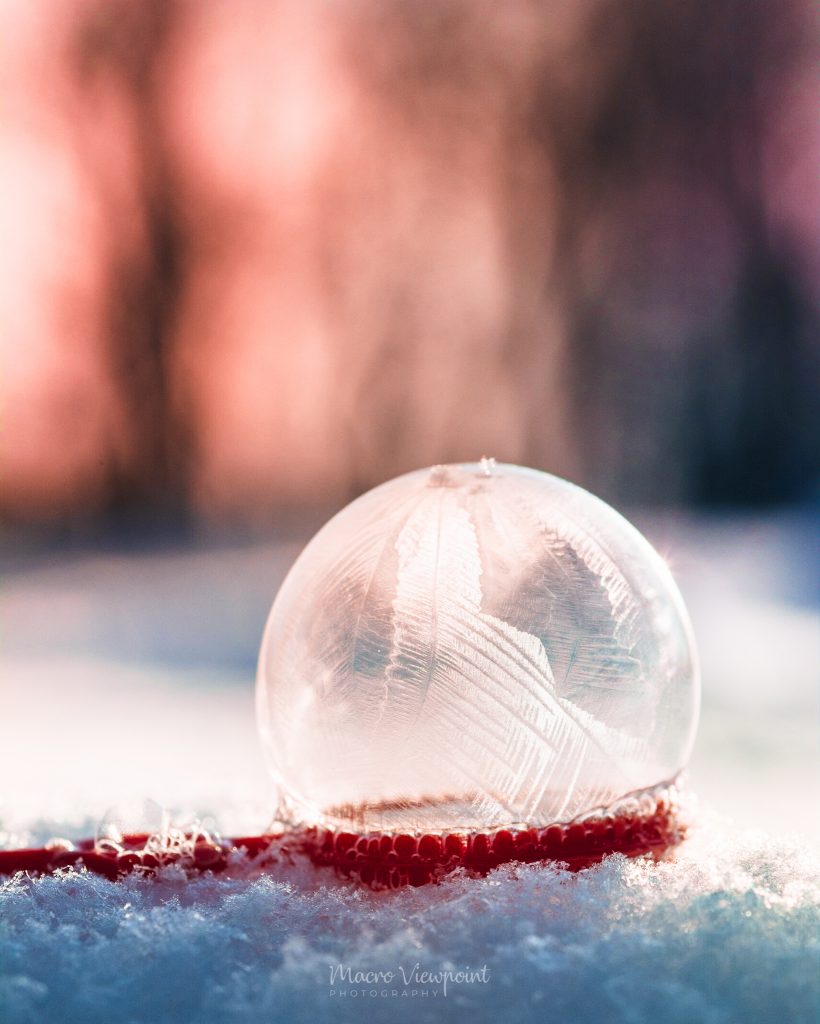
Photograph against the sunlight
When you have sunlight in the background, it can make the bubble look really pretty and lighten it up just perfectly when it’s frozen. And it can create some gorgeous bokeh in the background!
But it’s possible to get really amazing shots without sunlight, too. This photo was shot with no direct sunlight shining. All the beautiful warm tones are added up with editing.
Initiate the freezing of the bubble with some snow
I’ve noticed that the bubbles freeze in the spots where something cold touches the bubble. So by throwing some (take in mind that I say some, not a lot) snowflakes onto the bubble, you can initiate the freezing from those spots. Alternatively, you can touch some fallen snow with the bubble to initiate the freezing process. If multiple cold snowflakes land on the bubble, it will start freezing from all of those spots at the same time.
Feel free to check out my Reel on Instagram to see a time-lapse of how a bubble freezes!


Conclusion
Don’t hesitate to try this if it is at least -6°C (21.2°F) or colder. It definitely is worth a try as I just loved how beautifully they froze. Each bubble freezes differently and has a very beautiful pattern. Sometimes they might freeze without one if there is not enough sugar or it’s not cold enough (or due to some other reasons I haven’t found out about).
Did you find the tips useful? Feel free to leave a comment with your experience with the bubbles, or share a tip that I haven’t mentioned here. You can also send me your bubble photos on Instagram. I am more than happy to look at your beautiful results!
If you liked these tips, be sure to visit other blog posts I have written regarding photography:
10 top macro photography tips from me